Speedy connection with Mikrotik Router there are 2 kinds of ways, namely:
1. ADSL modem setting as PPPoE
2. ADSL modem settings as a bridge,
First step is setting up an ADSL modem as a Bridge:


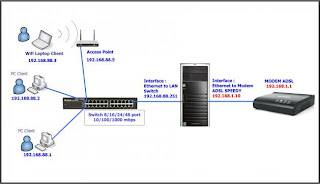
Seventh: When we have finished setting up a PPPoE client then once finished setting directly Mikrotik ADSL Modem dialup to us. If the setting is correct Username and Password then will appear the status of our mikrotik connection and on the menu IP -> IP Address will appear Sebuat new form of IP Public Address (125.164.75.150) given Telkom Speedy to customers based on Username & Password that we have.

Eighth: Then we set the NAT (Network Address Translation) for Client can connect to the Internet or to access the Internet. Way go to menu -> IP -> Firewall -> NAT (like the picture below).

Ninth: We'll make a fruit NAT Rule, the "General " -> Chain = srcnat, -> OutInterface = pppoe OUT1. Then in the option "Action" we select -> Masquarade.


In addition to the settings of the Console or from Winbox, we can also do this from WebBox NAT settings (if you think it made me sich Newbie Mikrotik easier than the setting of Winbox). How: Choose a Public Interface = ppp OUT1 then check the NAT then click "Apply".

Tenth: Next we add 1 piece of IP Route. Notice in the IP Address of the following Public IP is: Network = 125.164.72.1. Well, this is an IP Network IP Gateway Telkom Speedy who serve our connection. Add 1 piece of the New Route, Destination: 0.0.0.0 / 0 and Gateway = = 125.164.72.1.

Eleventh: Mikrotik Router Setting Up here we have finished. Ping test live connection from our Mikrotik. Perform test to IP DNS Speedy: 202.134.1.0 ping test to proceed to yahoo.com and other websites. If no reply then we have succeeded Mikrotik / configuration has been our success.

Twelfth: This step is we do on the PC Client. Mikrotik interface to the LAN IP is the IP Gateway for our Client PC. IP DNS on Client can we enter the IP DNS Speedy directly or IP DNS from Mikrotik (because we have a DNS Relay setting Mikrotik on the fifth step of this tutorial).

Okey, here Mikrotik until we have been functioning as a router and share internet access to all the other client has to be enabled. Well, the next stage we have to do is set the bandwidth Bandwidth Management or the right for all clients so that if any client who uses the software to download the Downloader can be controlled or in control so we do not spent their own bandwidth and Internet access with other clients do not be slow .

0 Komentar untuk "Installation Mikrotik with modem ADSL Router Speedy.."